

Flexo printing: the 12 top mistakes and their solutions!
Flexo printing mistakes: the 12 top mistakes and their solutions!
Flexo printing mistakes, and here are the most effective solutions to solve them that printers might experience at various stages while printing for packaging.
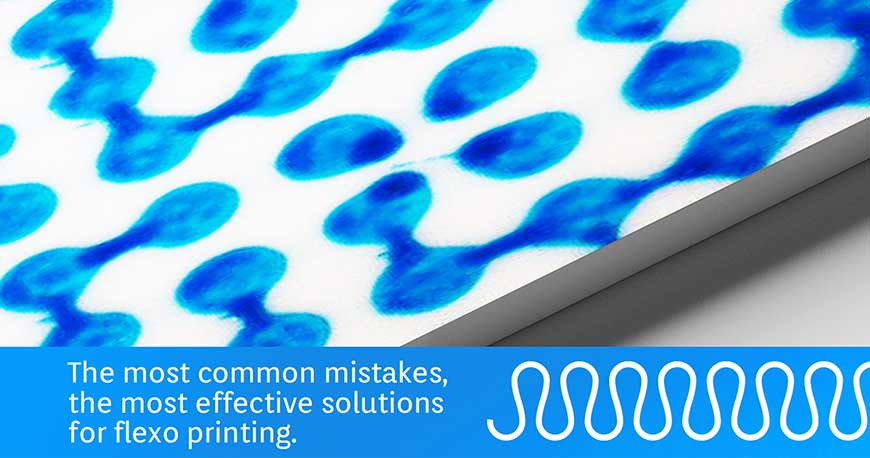
The commonest mistakes, the most effective solutions for flexo printing. Here some other common mistakes from the 24 that we already presented in our previous article and the related suggestions to check and solve them.
These are the 12 mistakes and the related solutions that might be useful for flexo printing:
- INK DRYING TOO SLOWLY
- INK DRYING TOO QUICKLY
- MISREGISTER
- MOIRÈ EFFECT
- MOTTLED PRINT
- PIN HOLING
- SKIP OUT
- STRIKETHROUGH
- HALOS
- BRIDGING EFFECT
- TRAPPING
- EMPTY POINTS
INK DRYING TOO SLOWLY. |
|
|
This happens when one colour gets mixed unexpectedly with another colour, or when colours are not overprinting correctly (wrong trapping). Ink is separated from substrate or is transferred onto other rollers of the printing system. This may cause the printed design to get pasted in between the reels.
|
|
|
CAUSES |
SOLUTIONS |
|
The first printed colour dries too slowly or the colour overptinting the first dries too quickly. |
Set drying speed and/or viscosity of the first printed colour to lowest value. Slightly increase viscosity of the second colour. Set pressure of plate to the lowest value to obtain a good print quality. |
|
Ink viscosity is too high or anilox roller is not correct. |
Check ink viscosity. Check anilox roller specifications. Check doctor blade and/or pressure of the inking roller. |
|
Poor or unbalanced drying. |
Dryer must conform to speed. Dryers must be balanced. |
|
Temperature of the printing hall too low and/or humidity too high. |
Set environmental conditions to ideal. |
|
Printing speed too high. |
Reduce printing speed. |
|
Wrong solvent balancing. |
Check ink viscosity according to the type of job. The four colour ink was filled by mistake into an anilox unit without doctor blade (with dosing system). |
PRO TIP
Digital flexo plates supplied by Flexo 24 comply with the precautions given by the photopolymer producer. Read carefully the precautions and the compatibility of inks with solvents.
INK DRYING TOO QUICKLY. | |
This happens when ink dries on plates and rollers without being transferred to the substrate. This defect often shows on the foremost edge of the substrate.
| |
CAUSES | SOLUTIONS |
pH value is too low, basic and not acid, due to amine loss. | Add a pH stabilizer into ink. |
Viscosity is not under control. | Keep viscosity into range. Do not print if viscosity is too high. |
Air stream on printing unit. | Keep direct ventilation away from printing units. Avoid air streams from doors, windows and fans. Check the air units of dryers. |
Wrong solvent balancing. | Use correct solvent mix; weak solvents make ink components drop. |
Poor ink transfer. | Use anilox with correct volume. Do not print if viscosity is too low. |
Reel temperature is too high when feeding into the printing unit. | Reduce pre-heating temperature when feeding inot the printing unit. |
Temperature of the printing hall too high and/or humidity too low. | Set thermic and hygrometric conditions near the machine to normal. |
BY SIGNING UP TO FLEXO 24’s NEWSLETTER YOU WILL ONLY RECEIVE HELPFUL INFORMATION AND AN IMMEDIATE €20,00 DISCOUNT FOR YOUR FIRST ORDER ABOVE € 199,00!

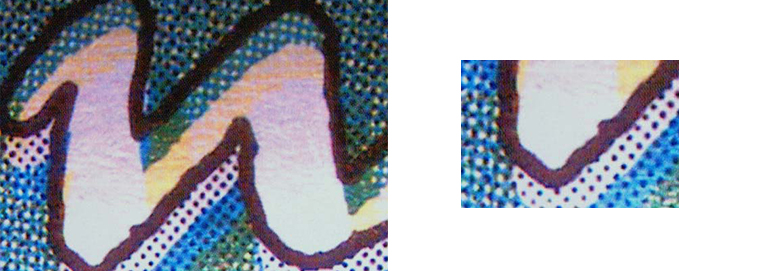
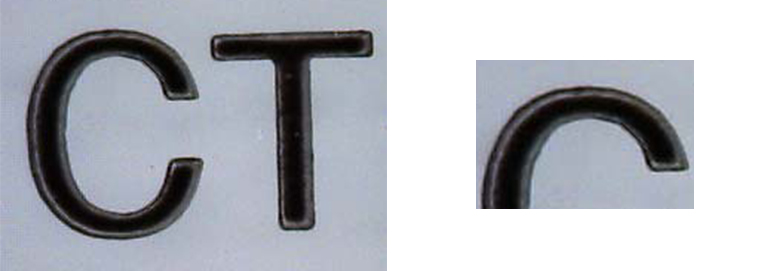
MISREGISTER. |
|
|
This might happen by all printing systems: colours are not overlapping correctly. Flexo 24 supplies a digital loupe to check accurately the printed substrate. The lens can be used on most smartphones and magnifies until 30x.
|
|
|
CAUSES |
SOLUTIONS |
|
Plates are not mounted in perfect registration. |
Re-mount plates in registration. Revise the preparation and mounting procedure. Check plate thickness, distortion, relief depth. Check tape thickness. |
|
Band tension of substrate material is not correct. |
Set the tension control according to the printing substrate. |
|
Wrong setting of the guide rollers. |
Check that guide rollers are parallel, pressure must be uniform on all the band width. |
|
Reel temperature is too high. |
Reduce drying temperature. |
|
Register compensators of machine are not centered. |
Center the lateral and axial Register compensators before setting manually the registration of the job. |
|
Idle rollers slow down or rotate intermittently. |
Replace or lubricate the shafts of the idle rollers. |
|
Machine is not aligned. |
Reset the machine alignment. |
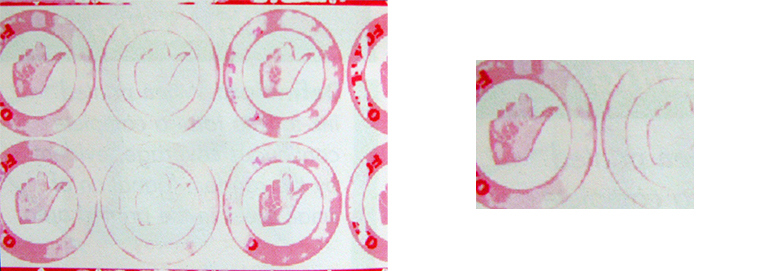
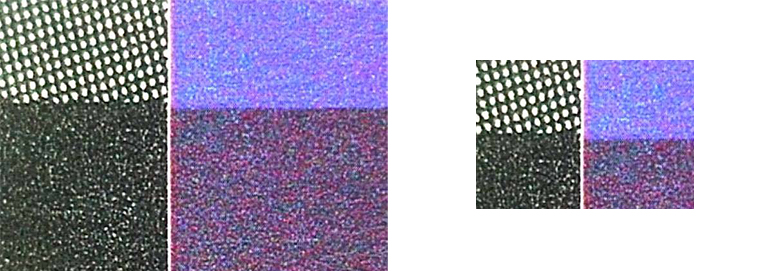
MOIRÉ EFFECT. | |
Moiré is an undesired optical interference due to a misalignment of the screen angles of the different colours. Flexo 24 also supplies the screen counter, a clear film stripe to check the printed screen count. With this tool the screen count can be determined through a straightforward optical analysis of the printed lines and the screen.
| |
CAUSES | SOLUTIONS |
Wrong screen angles. | The difference of the screen angles between colours should be 30°. Yellow should print at 15° from Cyan and Black. |
The screen value of the anilox is too close to the value of the plates, o double values. | The screen angle of the plates must be at 7,5° from the screen angle of the anilox. The ratio of the anilox/plate screen angle should be 5.5:1. For example, by plates at 40 lcm select a 220 lcm anilox. |

PRO TIP
As from prescriptions of the ISO standard 12647-6:2012 for flexo, the nominal difference between the screen angles of Cyan, Magenta and Black must be of 30°. While the deviation of Yellow is of 15°. No colours must have the same angle of the anilox. This is a moiré example: 65 lcm anilox used with a 33 lcm plate, because 33 x 2 = 66, which is too close to the anilox screen.
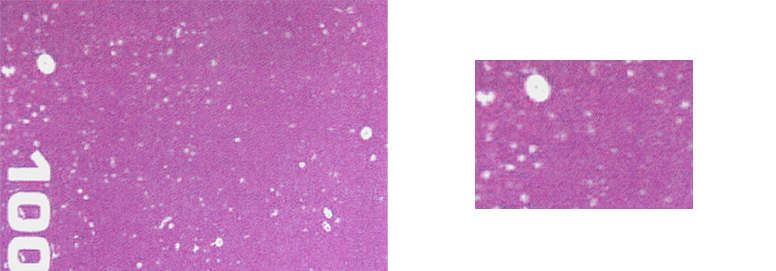
MOTTLED PRINT. | |
A mottled print shows large areas lacking uniformity and consistency in screened and solid printing. This is similar to the “foaming” issue that we discussed in the previous article about the first 12 mistakes.
| |
CAUSES | SOLUTIONS |
Surface of the plate is not uniform. | Increase pressure between plate and printed substrate. Increase ink viscosity. Increase thickness of the ink layer. Use a softer plate. |
Ink is too diluted or viscosity is too low. | Add fresh ink or a product to adjust viscosity and get a higher opacity. |
Printing roller is dirty or scratched. | Printing rollers must be cleaned accurately from ink or other materials. |
Surface of the plate is not uniform and reactive. | Use softer or compressible plates, or compressible tape. Check the surface treatment of substrate. |
Ink cannot be spread on the substrate (surface is not wetted). | Check solvent balancing. Change inking system. |
Traces of the shaping process left on the plate. | Clean the plate thoroughly with a compatible product. Remake the plate. |

PRO TIP
If you need to try new materials, we suggest to run a CALIBRATION TEST. This is useful to set the compensation curve for the dot gain.
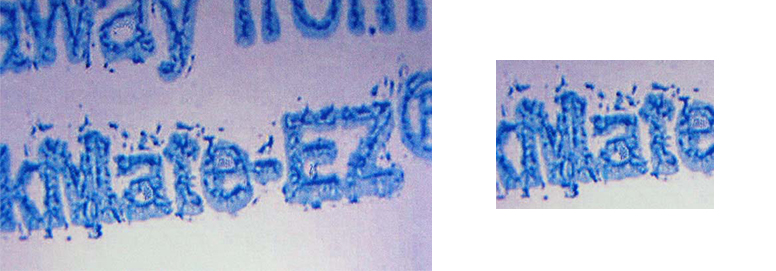
PIN HOLING. | |
This happens when the ink for flexo printing cannot cover completely and uniformly the substrate, causing some blank areas to appear. Flexo 24’s products are guaranteed for specific types of ink, always check the instructions before purchasing your plate.
| |
CAUSES | SOLUTIONS |
Ink dries on the anilox and does not transfer smoothly on the plate. | Use slow evaporating solvents. Reduce level of dryers. Increase print speed. |
Ink does not build a uniform layer on the substrate. | Reduce ink viscosity. Increase the thickness of the ink layer. Increase pressure between plate and substrate. Check the pre-treatment of the substrate or the surface of the substrate: this could be irregular or uneven. Check the inking system. |
Worn anilox rollers. | Check anilox rollers conditions and replace them if necessary. |
Dirt on the printing cylinder. | Clean the printing cylinder. |
Surface of substrate is not uniform or reactive. | Use softer plates or compressible tape. Check the treatment of substrate surface. |
SKIP OUT. | |
This happens when ink transfer is poor or when there is no ink transfer at all.
| |
CAUSES | SOLUTIONS |
Plate with shallow areas, non-engraved areas. | Check consistency in plate thickness. |
Poor quality of plates. | Check pressure to establish accuracy in the plate preparation. |
Pressure too low while printing. | Reset plate and/or anilox pressure. |
Failure in the locking system of the printing group. | Check that nuts are well fixed in the printing group. |
Cylinder for plate mounting not balanced. | Check eccentricity of plate cylinders, gears. Check the state of cleanliness and wear of shafts, pins, bearings and gears. |
Printing element is not parallel. | Set the printing unit for the right parallelism. |
Surface of the plate is not inked. Surface treatment of the plate is not correct. | Clean the plate thoroughly with a suitable solvent. Replace the plate. |
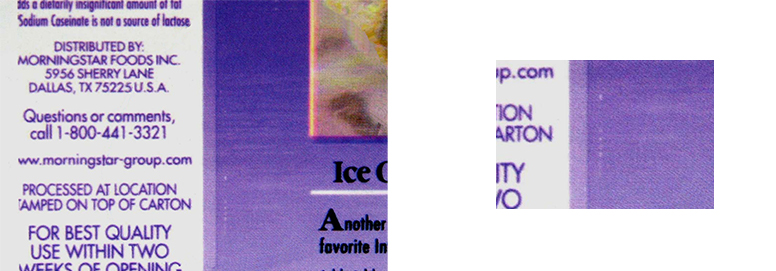
STRIKETHROUGH. | |
This happens when “stripes”, rectangular, undesired darker bands appear on the printed material. These are defects of various dimensions, irregular or repeating with the same frequency.
| |
CAUSES | SOLUTIONS |
TIR of the spinning units out of tolerance. | Check and adjust the concentricity of the carrier (cylinders and sleeves) and of the anilox rollers as prescribed. |
Gears are damaged, worn-out or dirty. | Check gears condition. |
Doctor blade: too thin or low quality. | Use a thicker doctor blade. |
Substrate is floating. | Set tension of substrate. |
Check specifications of plates and tape. | Use plate and tape according to the machine specifications. |
Pressure between anilox and plate is too high: this could be the cause for vibrations in the gear system. | Check and set pressure between anilox and plate. |
Higher pressure of ink on the doctor blades causing a pulsing effect that might affect the anilox inking. | Supervise ink flow. If the pump gets overloaded maybe its range is too low. |
Layout of the plates does not cover the cylinder entirely. | Revise the layout of the design on the plates. |
Printing press has some vibrations that might affect the printed results. | Change printing speed (vibrations might show only at a certain speed). |
HALOS. | |
Printed graphics, text or screens, appear surrounded by an irregular, unintended line or bar that changes their size.
| |
CAUSES | SOLUTIONS |
Uneven printing pressure. | If the eccentricity of the carrier or sleeve, called "TIR", is out of specification, check the values and correct them. |
Excessive inking. | Use lower volume anilox. (link to glossary). |
| Excessive hardness of the plate. | Use softer cliches and check the double-sided tape. |
PRO TIP
The plate hardness is measured in Shore degrees: °Shore. With Flexo 24 you can order from 1.14 mm flexo plates with hardness about 74° - 77° Shore to 5.50 mm plates with hardness 33° Shore. Even the Calibration tests for flexo. Please contact our customer service for further information.
BRIDGING EFFECT. | |
From a close analysis of the printed design, dots are bridging randomly instead of being sharp and well detached. For an accurate analysis of the printed material, we suggest our digital loupe that can be used on most smartphones.
| |
CAUSES | SOLUTIONS |
Anilox volume is too high. | Check and reduce anilox volume. |
Screen of plates is too high in relation to anilox. | Check and balance screen count between plate and anilox. |
Ink viscosity is too high, or ink is not suitable for printing screened jobs. | Adjust viscosity of ink or change type of ink. |
Dirt on plates caused by paper dust. | Clean the plates and check paper conditions. |
Printing pressure is too high. | Set pressure. |

TRAPPING. | |
Irregular coverage of the colours following the first one. These colours are partially rejected by the substrate. The value of trapping can be measured with a densitometer.
| |
CAUSES | SOLUTIONS |
Drying of overprinting colours not satisfactory. | Reduce ink layer, increase drying level between the colours. |
Total ink density of the overprinting colours is too high. | Check the final graphic results and use a lower value for “Total ink” or “Total area coverage” according to the printing system. |
Ink viscosity of the second colour too low or tiro too high. | Set ink viscosity and tiro according to the printing sequence. |
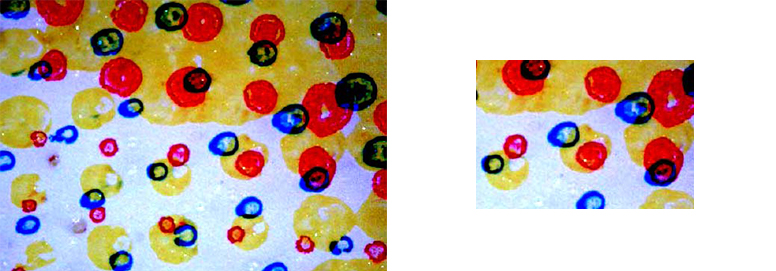
EMPTY POINTS. | |
The printed dots of the screen appear in the overall result of the flexographic printing, as deformed circles depending on the concomitance of "slur phenomena".
| |
CAUSES | SOLUTIONS |
Printing pressure too high. | Reduce printing pressure to normal values. |
Plate too hard and/or tape too stiff. | Use softer plates and suitable tape. |
Ink usage is too high. | Check and adjust the ink usage by adding suitable solvents. |
Ink viscosity too low. | Adjust viscosity to normal values. |
Buy your flexo printing plates now with Flexo 24.


